
Turning a blank wall into a gallery of your favorite moments is so much more than decorating—it’s about telling your story with intention and heart. The secret to arranging photographs on a wall beautifully is to choose a layout style that resonates with you, map it out on the floor, and use paper templates to perfect your vision before a single nail meets the wall.
Your Guide to Creating a Meaningful Photo Wall
A blank wall is a canvas awaiting your life's story. Creating a photo gallery isn't just about filling space; it's a powerful act of curating joy and celebrating your personal journey. Studies in environmental psychology show that personalizing our living spaces with meaningful objects, like photographs, can significantly boost our sense of well-being and belonging.
Every photograph holds a memory, an emotion, a piece of who you are. By arranging them thoughtfully, you create a dynamic focal point that infuses your home with an authentic, inspiring energy.

This guide will empower you to move beyond simple tips and curate a display that brings genuine inspiration to your daily life. Let's find a style that truly speaks to you, map out your layout with confidence, and hang your photos with purpose.
Finding Your Personal Style
Before you pick up a hammer, take a quiet moment. How do you want this wall to feel? Your photo wall is a reflection of your home's spirit and your unique story. Are you drawn to the calm of clean lines and order, or the soulful energy of an eclectic, free-flowing collection?
Getting clear on your aesthetic is the first step. Here are a few popular styles to spark your imagination.
Three Popular Photo Arrangement Styles
| Arrangement Style | Best For | Overall Vibe |
|---|---|---|
| The Symmetrical Grid | Modern, minimalist, or formal spaces where you want a clean, organized look. | Calm, orderly, and polished. Feels very intentional and cohesive. |
| The Organic Cluster | Eclectic, bohemian, or family-focused spaces that feel lived-in and cozy. | Relaxed, personal, and whimsical. Perfect for growing your collection over time. |
| The Salon Wall | Bold, artistic, and maximalist spaces where you want to make a dramatic statement. | Expressive, rich, and curated. Creates a collected-over-time feeling. |
Choosing a direction, whether a structured grid or a free-flowing salon style, will make all the next steps flow with ease.
A well-arranged photo wall does more than decorate a room; it serves as a daily reminder of your most cherished moments, grounding you in gratitude and personal history.
Letting Go: The Art of Organic and Asymmetrical Layouts
Ready to break free from the straight and narrow? If perfectly aligned grids feel too rigid, an organic, asymmetrical layout might be what your soul is calling for. This approach creates a display that feels like it grew over time—a warm, personal collection of moments that tells your unique story.
The magic of this style is its relaxed, lived-in feel. It’s less about precision and more about capturing a feeling. An organic arrangement allows your gallery wall to breathe and evolve, making it the perfect choice for a home that feels cozy and authentically you.
Finding Beauty in Balance (Not Symmetry)
The secret to a stunning organic layout is to embrace the "Rule of Odds." Grouping photos in sets of three, five, or seven creates a composition that feels more dynamic and natural to the human eye. This design principle is rooted in the idea that our brains find asymmetry more engaging and visually appealing.
This shift away from rigid structure is a major trend. Experts are seeing a move toward fluid, mindful arrangements that feel calming and personal. It’s about creating a meditative vibe in your home. You can see more of these evolving picture hanging trends for extra inspiration.
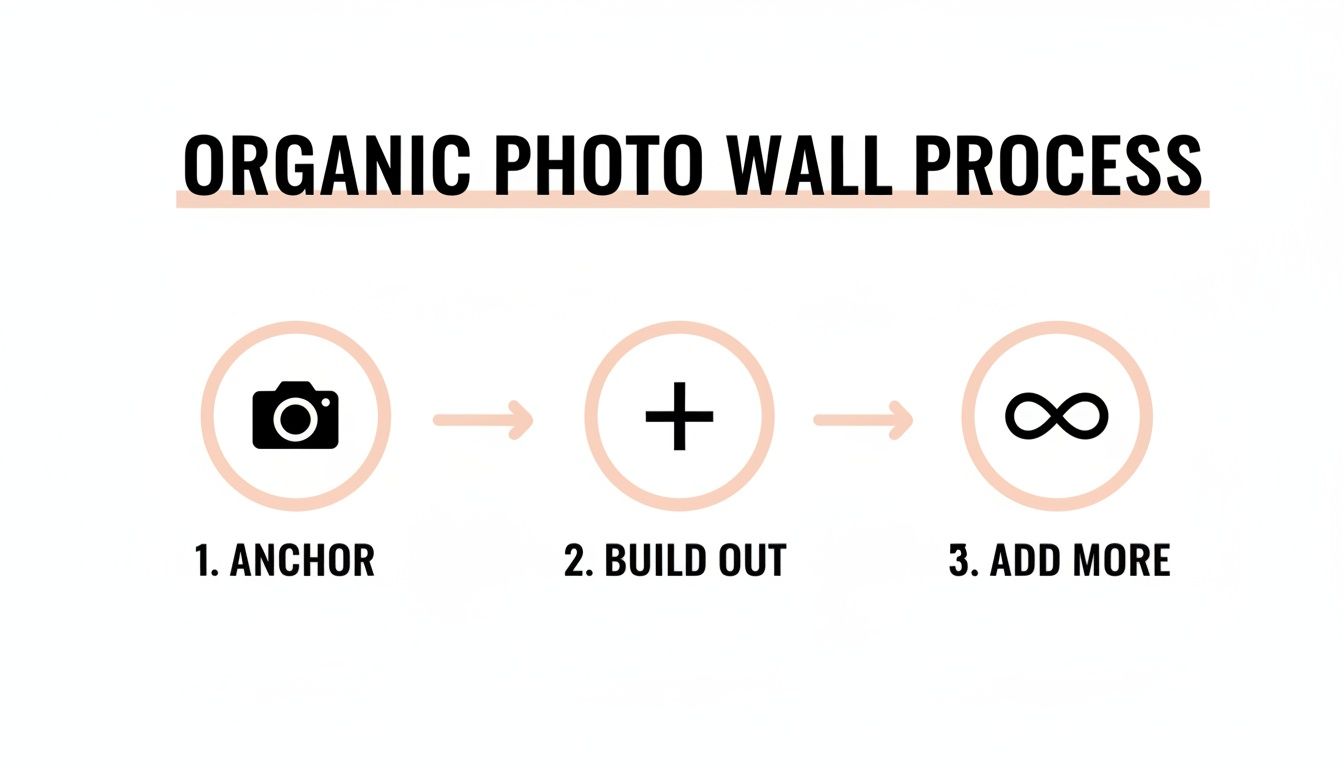
How to Build Your Organic Arrangement
Creating a beautiful, off-balance display is simpler than it looks. The key is to start with a single focal point and let the rest of your collection flow from there, like ripples in a pond.
Action Plan: Your Organic Layout
- 1. Pick Your Anchor: Start with your largest or most sentimental piece. This is your "anchor," the visual heart of your gallery. Place it slightly off-center to kickstart the asymmetrical flow.
- 2. Build Outward: Add other photos around the anchor, like mapping a constellation. Mix vertical and horizontal frames to create a dynamic rhythm.
- 3. Play with Placement: Stagger the heights and sizes of your frames to give the arrangement its collected feel. A mix of large statement photos and smaller, intimate shots adds wonderful depth.
Remember, the empty space between your frames is just as important as the photos. This "negative space" gives each memory room to breathe and keeps your wall from feeling cluttered.
By starting with a strong anchor and building outward, you can arrange photographs on a wall in a way that feels both intentional and beautifully spontaneous. The result is a gallery wall that’s a true reflection of you.
How to Plan Your Gallery Wall Layout
A little planning goes a long way in turning a stack of photos into a stunning gallery wall. Taking a moment to map out your vision is the secret to a flawless, professional finish. It saves you from a wall full of unnecessary nail holes and ensures your final arrangement feels intentional.
The most inspiring gallery walls don’t happen by accident. This planning stage is where you get to experiment and perfect your composition. If you're feeling overwhelmed, figuring out the best way to organize photos first can make the process feel much simpler.
From Floor to Wall: A Practical Guide
The best way to visualize how your photos will interact is to arrange them on the floor first. Clear a space that mimics your wall area and start laying out your framed pieces. This is your creative sandbox—slide frames around, swap pictures, and adjust spacing until the composition feels just right.
Once you have a floor layout you love, it's time to transfer that vision to the wall.
Action Plan: Mapping Your Wall
- 1. Create Paper Templates: Trace each frame onto craft paper and cut out the shapes. This is a game-changer.
- 2. Mark the Nail Spot: On each paper cutout, poke a hole exactly where the nail or hook needs to go.
- 3. Tape Them Up: Use painter's tape to stick the paper templates on the wall, replicating your floor arrangement. Now you can stand back and see a full-scale preview.
This simple workflow helps you build out your wall organically, starting with a key piece and growing from there.
Starting with a central "anchor" piece allows you to build outwards, ensuring the display feels balanced and can even grow over time as you add more memories.
Mastering Placement and Spacing
With your templates perfectly placed, a few key design principles guarantee a polished result. These are the same guiding concepts that galleries use to create visual harmony.
A great rule of thumb is to hang your art at the right height. You want the center of your entire arrangement to be at eye level, which is typically 57 to 60 inches from the floor. This is known as the "gallery standard" and creates a comfortable, natural viewing experience.
"Treat the whole collection as one piece. Engage as much of the wall as possible and orient the collection in the shape of the wall. The last thing you want is your art to look itty bitty on a big wall."
Just as important is the space between your frames. Consistent spacing makes a collection feel like a single, unified piece. Aim for 2 to 5 inches between each frame. A tighter gap creates a dense, classic look, while wider spacing gives each photo more room to breathe. The key is to keep it consistent.
Creating an Eclectic Salon Style Arrangement
For the soulful collector and the lover of stories, nothing beats the salon-style arrangement. It's the ultimate form of self-expression—a dynamic, floor-to-ceiling display that feels curated over time, turning your home into a vibrant sanctuary of memories.
This approach is all about beautiful, organized chaos. It joyfully mixes different frame styles, sizes, and even types of art. There's an incredible freedom here that lets you blend precious family photos with art prints, quotes, and meaningful objects from your journey.
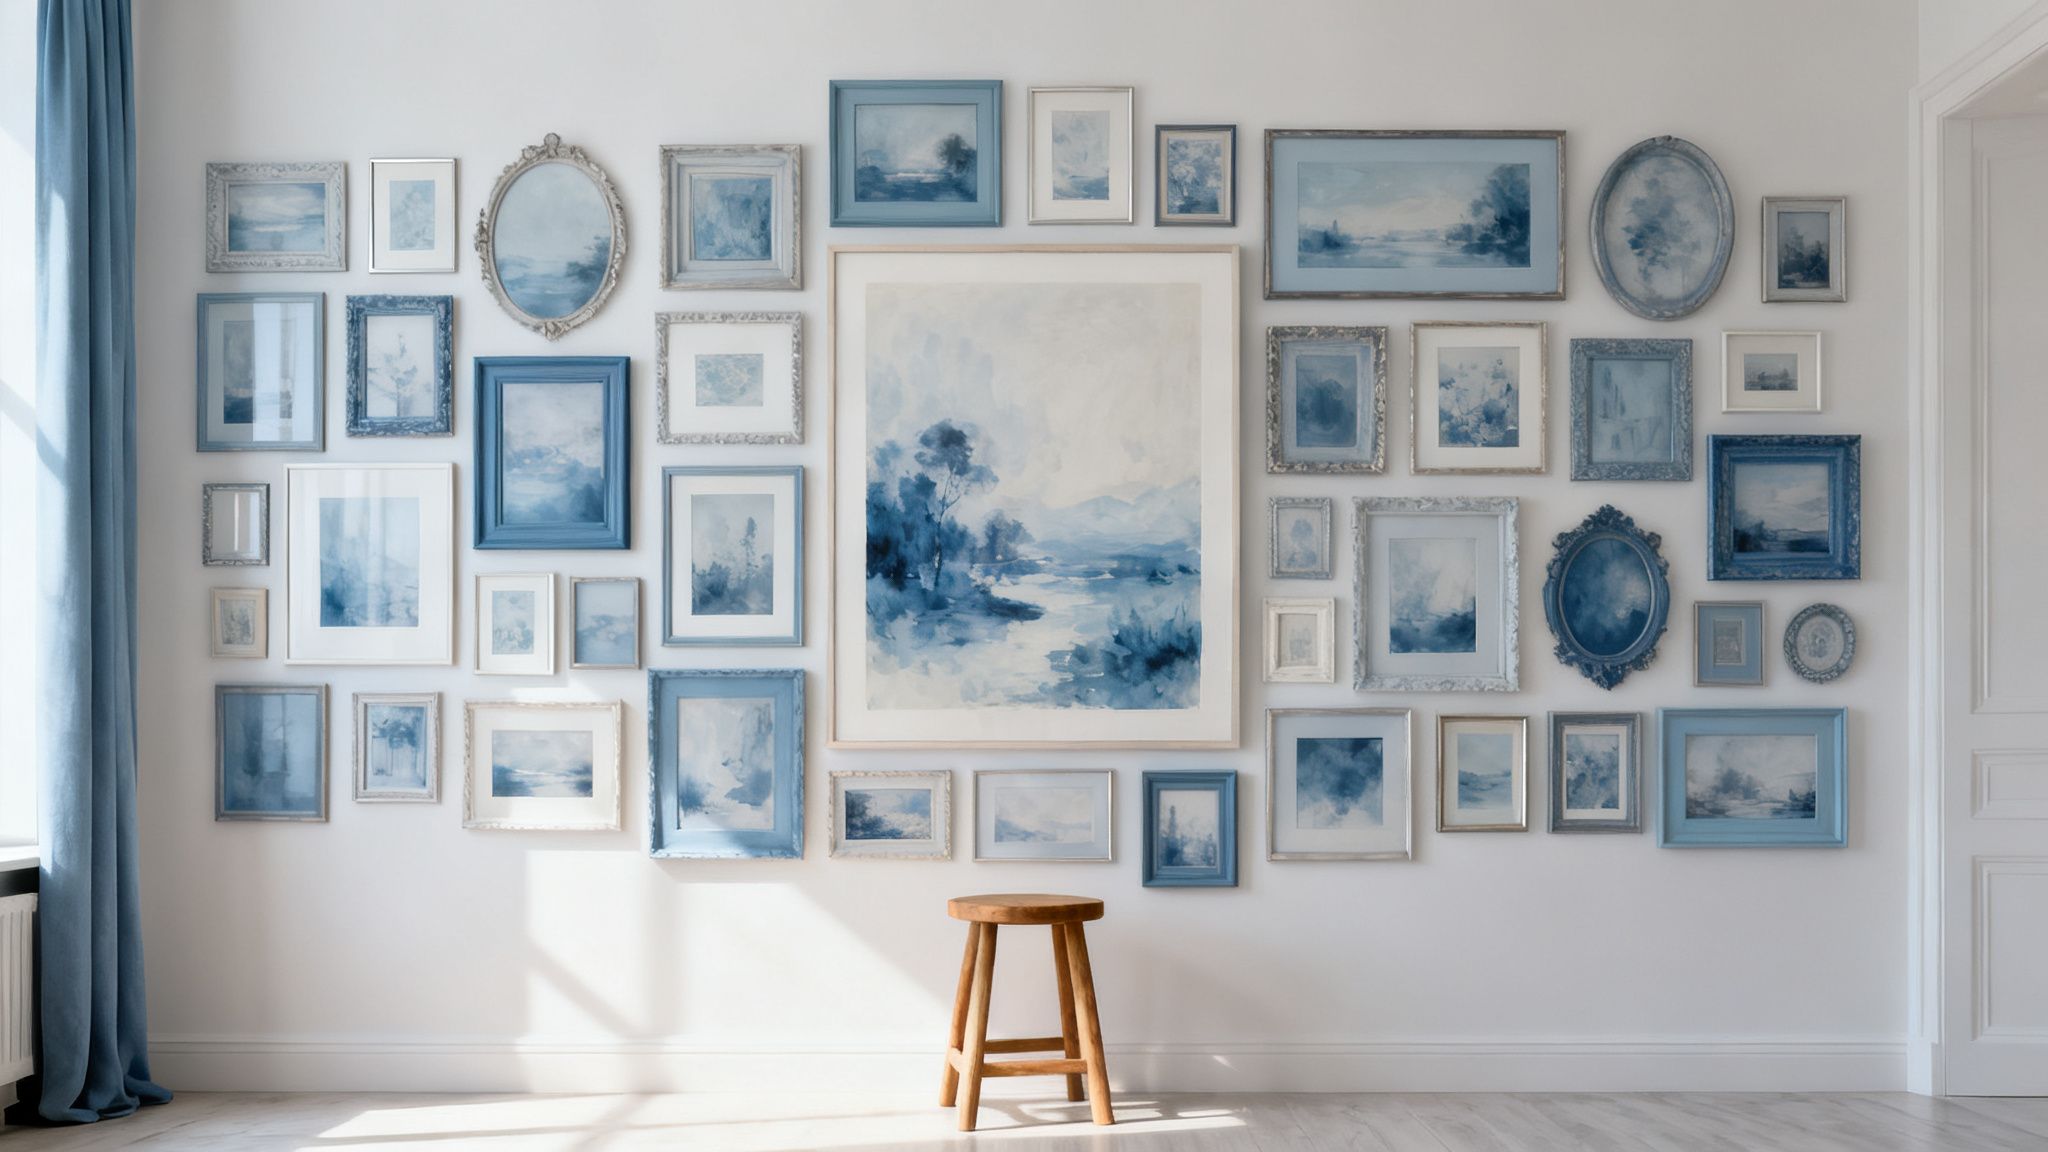
The salon wall becomes a visual story of your passions. And it’s a style with staying power. The global wall art market is projected to grow to $145.49 billion by 2034, with personalized arrangements seen as key to emotional well-being. You can dive into more insights on the growth of personalized wall decor.
Finding Harmony in the Mix
How do you arrange photographs on a wall for a salon look that feels cohesive, not cluttered? The secret is finding subtle threads that tie everything together.
Action Plan: Unifying Your Salon Wall
- Establish a Color Story: Feature a common color in most pieces. It could be a shade of blue in your travel photos or a warm sepia tone in vintage portraits.
- Use Consistent Matting: Even with a mix of frames, using the same color mat—like crisp white or warm ivory—can create a polished look.
- Anchor with Large Pieces: Place your two or three largest pieces first. Spread them out to create a balanced foundation, then fill in the gaps with smaller frames.
"A salon wall is your visual autobiography. Don't be afraid to mix high and low, new and old, photographs and objects. The magic is in the mix and the stories they tell together."
This approach invites you to be playful and intuitive. A salon wall isn't meant to be perfect; it's meant to be you.
Tips for a Flawless Salon Hang
Once your collection is ready, the real fun begins. Unlike a simple grid, a salon wall is organic and requires creative puzzling to get just right.
My best advice? Lay everything out on the floor first. This lets you see the relationships between pieces and perfect the spacing before a single nail touches the wall. Aim for a relatively consistent gap—around 2-3 inches—between each frame. This prevents the wall from looking too busy and gives each piece just enough breathing room.
Think of your salon wall as a living gallery, one that can grow and change right along with you.
Choosing the Right Tools for Hanging Photos
With your layout perfected, it's time to bring your gallery wall to life. Having the right tools on hand is what separates a frustrating afternoon from a truly satisfying project. The right hardware empowers you to hang your memories with confidence, knowing they'll stay secure and look polished.
Think of this as lovingly preparing your art for its debut. A good DIY framing guide can help you prep your pieces like a pro, making sure every detail adds to the beautiful final display.
Your Essential Toolkit
You don't need a professional workshop to get a gallery-quality result. A few key tools will make all the difference.
Action Plan: Your Toolkit Checklist
- Measuring Tape: Absolutely non-negotiable for getting spacing and height just right.
- Pencil: For lightly marking where your nails or hooks will go.
- Level: A classic bubble level or a laser level for perfect alignment.
- Hammer & Picture Hanging Nails: The tried-and-true classic for lighter frames.
- Stud Finder: Don’t skip this for your heavier, statement pieces. You'll want the extra security of hanging them directly into a wall stud.
With these basics, you're ready. Having the right equipment makes arranging photographs on a wall feel less like a chore and more like a fun, creative act.
A level is your best friend for a professional-looking gallery wall. It’s the small detail that separates a good arrangement from a great one, ensuring every frame hangs with perfect, calming precision.
Damage-Free and Specialty Solutions
Not everyone can—or wants to—put holes in their walls. Whether you're renting or just love to redecorate, there are fantastic damage-free solutions out there.
Adhesive strips are a brilliant choice for lighter frames. They stick securely and pull off cleanly without leaving a mark, making them ideal for apartments or anyone who likes the freedom to change their mind. We dive deeper into these options in our guide on how to hang pictures without damaging your walls.
For older plaster walls, which can crumble, specialty plaster hooks are a much safer bet. For a particularly heavy frame, always use heavy-duty wall anchors designed to hold significant weight.
Here’s one last pro tip: use two hooks or nails instead of one for each frame. Place them about a third of the way in from each side. This simple trick provides much more stability and keeps your art looking perfectly straight.
Bringing Your Vision to Life
Now that you have the knowledge and tools, it's time to bring your beautiful vision to life. Remember, this isn't just decorating—it's about mindfully curating joy and celebrating your personal story on your walls. Trust your intuition, enjoy the creative process, and build a space that feels completely you.
Your home is your sanctuary, and a thoughtfully arranged photo wall is one of the most powerful ways to fill it with beauty and meaning. With these steps, you have everything you need to start your project with confidence.
Your walls are a canvas for your memories. Every photo you hang is a testament to a moment that mattered, a person you love, or a dream you hold dear.
It’s time to turn those cherished memories into a stunning display that brings a smile to your face every day. As you gather your pieces, think about how they can complement other elements in your home. You can explore home decor gift ideas to find unique items that integrate beautifully, adding even more personality to your new favorite space.
Your Top Photo Arranging Questions, Answered
Once you start, a few questions always come up. Getting these details right is what elevates a pretty display into a truly stunning one. Let’s walk through the most common puzzles so you can build your gallery wall with total confidence.
What's the Perfect Height to Hang My Photos?
Here’s a timeless tip straight from the pros: hang the center of your entire arrangement at eye level. For most homes, that sweet spot is 57 to 60 inches from the floor. This creates a natural, comfortable viewing height that just feels right.
This isn't a rigid rule. If you have soaring ceilings, feel free to shift the collection up a bit to match the scale of the room. The trick is to always think of your gallery wall as one single, cohesive piece of art.
How Much Space Should I Leave Between Pictures?
Spacing sets the whole mood of your gallery wall. A good rule of thumb is a consistent gap of 2 to 5 inches between each frame. The distance you choose depends on the vibe you’re creating.
- For a cozy, collected feel (2-3 inches apart): Tighter spacing creates a dense, unified look, perfect for eclectic, salon-style walls.
- For a light, airy look (4-5 inches apart): Wider spacing gives each photo its own moment to shine, beautiful for structured grids or minimalist arrangements.
Do All the Frames Have to Match?
Not at all—unless you love that cohesive look! This is all about your personal style. Matching frames create a clean, formal feel that works beautifully in modern or traditional spaces.
But mixing frames is where the personality shines. A blend of different styles, materials, and colors adds texture and charm, giving your wall a unique, collected-over-time vibe. If you go this route, find a common thread to tie it all together—like a recurring color in the photos or consistent matting.
Ready to fill your home with moments that matter? At Mesmos, we believe in the power of surrounding yourself with beauty and inspiration. Discover our collection of mindful home decor and gifts designed to bring more peace and joy into your life. Find your next cherished piece at https://mesmos.co.
