
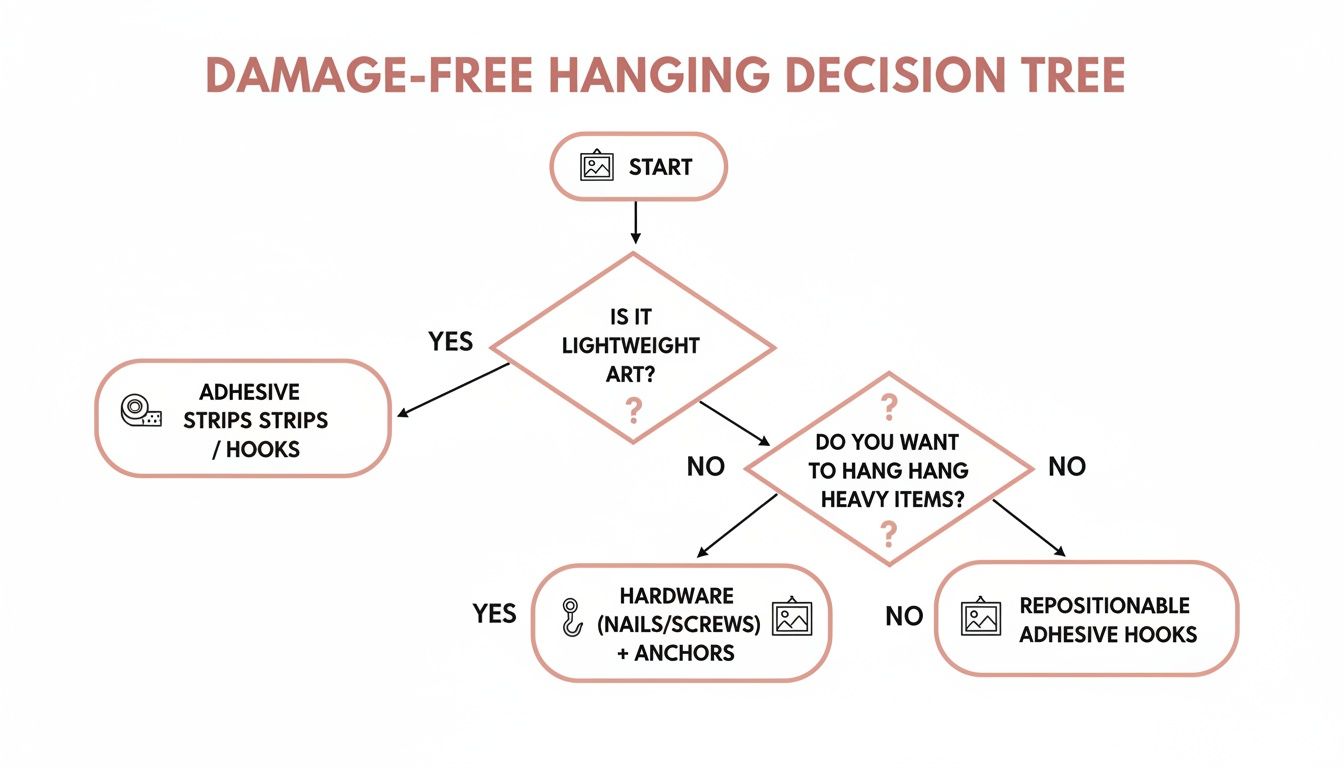
Your fastest path to getting cherished art on your walls without leaving a single mark is using adhesive strips or hooks. These clever tools are scientifically designed to create a strong bond yet peel away cleanly, leaving your paint—and your peace of mind—perfectly intact. They are an absolute dream for renters or anyone who loves to refresh their decor on a whim.
Create Your Personal Gallery, Worry-Free
There’s a special magic in transforming your space with art and photos that tell your story. It’s what makes a house feel like a home. But the thought of hammering a nail into a pristine wall? It can be paralyzing. If you’ve ever hesitated, worried about permanent holes, cracked plaster, or losing that security deposit, you are not alone.
Think of this guide as your permission slip to finally create the home you’ve been dreaming of, completely stress-free. We’re going to move past the fear of damage by exploring simple, elegant, and effective ways to hang your art. Forget keeping spackle and touch-up paint on hand—your journey to a beautifully decorated space that truly reflects you starts now.
Embrace the Freedom of Damage-Free Decorating
The universal desire to personalize our homes without leaving a trace has sparked incredible innovations in hanging solutions. A recent survey of over 5,000 renters found that a staggering 68% named wall damage from hanging pictures as their biggest decorating worry. That anxiety often comes with a real cost, with security deposit deductions for wall repairs averaging $250.
This has fueled a powerful shift toward damage-free options, with sales for products like Command Hooks jumping 45% year-over-year. People are actively seeking ways to create peaceful, personal spaces without the permanent commitment.
This guide will walk you through the most reliable choices out there, so you can pick the perfect method for your art and your walls. We'll cover:
- Action Point: Use Adhesive Strips for lightweight frames on smooth, painted drywall.
- Action Point: Choose Specialty Hooks for tricky surfaces like plaster, brick, or tile where normal adhesives won't work.
- Action Point: Rely on Clever, Low-Impact Hardware like tiny nails or anchors that leave nearly invisible pinholes, giving you extra security when you need it.
Your home should be a canvas for your life's moments, not a source of stress. By choosing the right damage-free tools, you can swap fear for freedom and start building a space that inspires you every single day.
With these tools in your pocket, you can finally put up that gallery wall you’ve been pinning, display cherished family photos, and refresh your decor whenever you feel inspired. For more ideas on finding pieces that match your style, check out our guide to beautiful home decor. Let’s get started turning those blank walls into a true reflection of you.
Mastering the Art of Adhesive Hangers
Imagine completely transforming a room in less than an hour, using nothing more than your favorite art and a few clever adhesive strips. That's the real magic of adhesive hangers—they're a game-changer for anyone who wants to hang pictures without leaving a trace.
These are the perfect solution for renters, dorm residents, or homeowners who just love to switch things up.
It’s not just sticky tape; it's smart science. Most of these strips use a pressure-sensitive adhesive that creates a strong bond when you press it firmly against the wall. But the real genius is in the removal. The pull tab is designed to stretch, cleanly breaking the adhesive bond without ripping off your paint. It’s a simple, elegant way to decorate with total freedom.
Choose Your Adhesive Ally
Not all adhesive hangers are created equal. The market is full of options, from tiny clear hooks perfect for fairy lights to heavy-duty strips that can hold surprisingly large frames. To make sure your art stays put, you have to match the product to the job.
Here’s a quick rundown to help you decide:
- Picture Hanging Strips: These are the workhorses for framed art. They come in pairs that lock together like Velcro, which is great for making tiny adjustments after you hang something. They work best on smooth, painted surfaces with flat-backed frames.
- Adhesive Hooks: Perfect for frames that have a wire or a sawtooth hanger on the back. They come in all sorts of sizes and weight capacities.
- Adhesive Putty or Tabs: Best for unframed posters, prints, or super lightweight items. While they're convenient, they have the least amount of holding power and are really meant for temporary displays.
Practical Action Point: The absolute key to success is checking the weight limit. A simple trick to weigh your art is to step on a bathroom scale by yourself, then step on it again while holding the picture. The difference is your artwork's weight—always choose a hanger rated for a little more just to be safe.
Your Guide to Damage-Free Adhesive Hangers
To make things even easier, here’s a quick comparison to help you choose the right adhesive hanger based on your artwork's weight, wall surface, and frame type.
| Hanging Method | Best For | Weight Limit (Typical) | Removability | Surface Compatibility |
|---|---|---|---|---|
| Picture Hanging Strips | Framed photos, canvas prints, mirrors | 4 to 20 lbs | Clean removal tab | Smooth, painted drywall; finished wood; tile |
| Adhesive Hooks | Art with wire or sawtooth hangers | 1 to 8 lbs | Clean removal tab | Smooth, painted drywall; tile; glass; metal |
| Adhesive Putty | Unframed posters, paper art, photos | Up to 1 lb | Reusable, may leave oil residue | Most smooth surfaces; not for delicate paper |
| Adhesive Tabs | Lightweight posters, kid's art | Up to 1 lb | Can be tricky to remove cleanly | Smooth, painted walls |
Think of this table as your cheat sheet for a quick, confident decision.
The Perfect Application for a Lasting Hold
The real secret to making adhesive hangers work flawlessly is all in the prep and application. Skipping these steps is the number one reason they fail. You have to create the perfect canvas for the adhesive to do its job.
Follow this simple process for a bond that won't quit:
- Clean the surface. First, wipe the spot on the wall with isopropyl rubbing alcohol. Don't use household cleaners or water—they can leave behind a slippery film that keeps the adhesive from grabbing on. Let it dry completely.
- Apply the strips. Press one side of the strip firmly to the back of your frame. Then, press the other strip to the wall, holding it down for at least 30 seconds. That pressure is what activates the bond.
- Let it cure. This is the most important step people skip. After sticking the strips to the wall, walk away. Wait at least one hour before hanging anything. This "curing" time lets the adhesive build strength for a secure hold.
- Hang your art. Finally, line up the frame with the strips on the wall and press firmly until you hear that satisfying "click." That sound means they've locked together securely.
By taking a few extra minutes to prep properly, you’re creating a reliable, long-lasting hold that gives you total peace of mind.
Common Missteps and How to Avoid Them
Even though adhesive hangers are incredibly useful, they do have their limits. Knowing what they can't do is just as important as knowing what they can.
Keep these common issues in mind:
- Textured or Delicate Surfaces: These strips need a smooth, flat surface. They’re generally not a good idea for brick, heavily textured wallpaper, or unpainted cinder blocks.
- Humidity and Temperature: High humidity, like in a bathroom without a good fan, can weaken the adhesive over time.
- Fresh Paint: It’s so tempting to decorate as soon as the paint is dry to the touch, but you have to wait. Let new paint cure for at least seven days before you stick anything to it. If you don't, the paint will likely peel off when you try to remove the strip later.
Once you master these simple techniques, adhesive hangers become a reliable decorating partner. You get the freedom to create, curate, and change your space whenever you want, building a gallery wall that truly evolves with you.
Secure Solutions for Heavier Art
While adhesive strips are fantastic for lighter frames, some of your most cherished pieces—like a big mirror, a heavy canvas, or a multi-panel art installation—demand a bit more security. This doesn't mean you have to resign yourself to massive, wall-shattering nails and the repairs that follow.
Instead, we can turn to smarter, low-impact hardware that provides incredible strength with minimal fuss. Choosing the right hardware is about giving your meaningful artwork the support it deserves, ensuring it hangs securely for years to come.
Finding the Hidden Strength in Your Walls
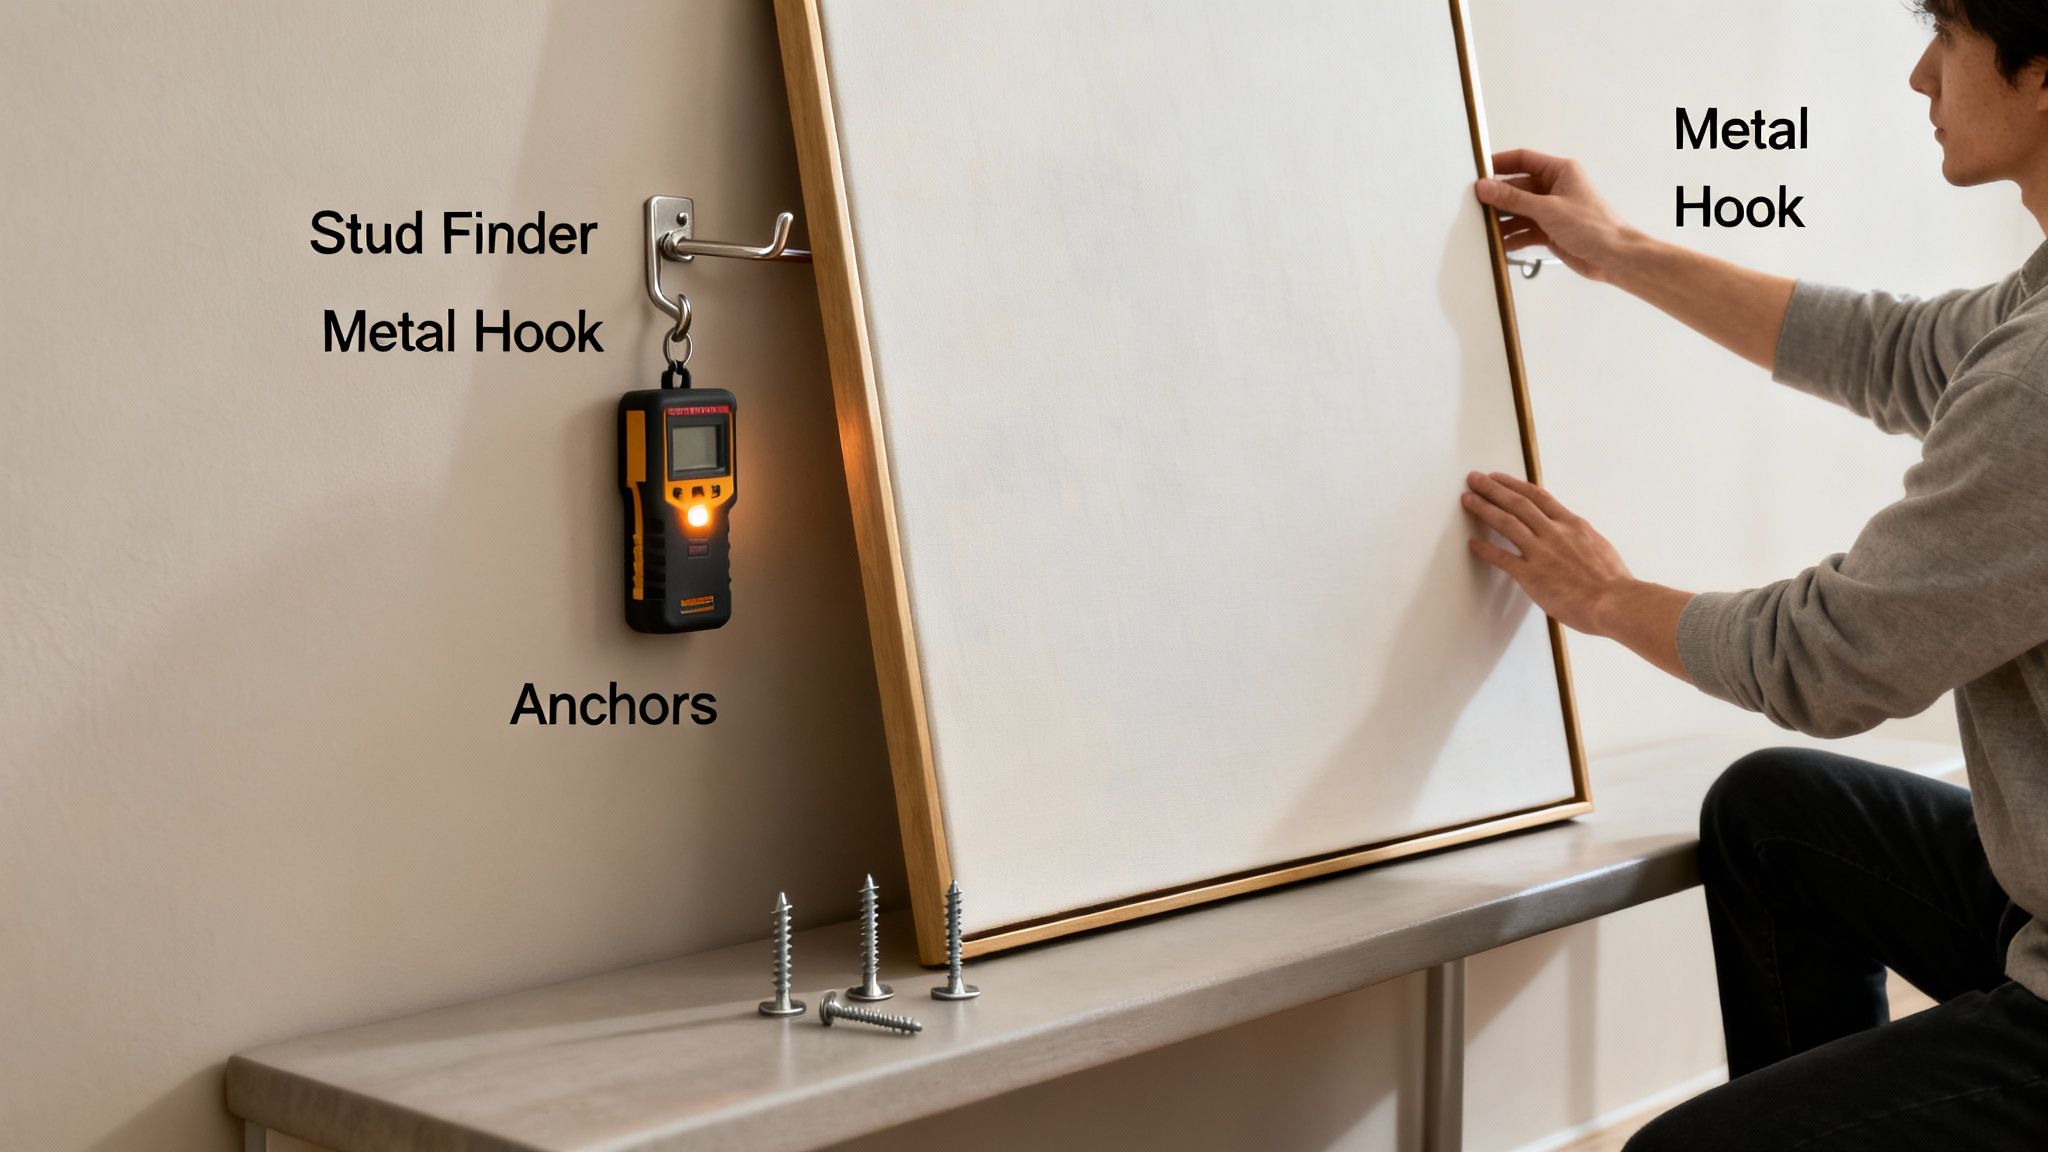
The absolute best way to hang anything heavy is by anchoring it directly into a wall stud. Studs are the vertical wooden beams that make up your home's framework, usually spaced 16 inches apart. Driving a screw into a stud is like hanging your art from the very skeleton of your house—it’s the strongest and most secure method there is.
Practical Action Point: Use an electronic stud finder. Just glide it across the wall, and it will beep or light up when it detects a stud. This small step is your most powerful tool in preventing wall damage.
Historically, 42% of homes show drywall damage from improper hanging techniques, costing homeowners billions in repairs. The rise of low-impact hardware and techniques like stud-finding has dramatically reduced this issue. If you'd like to learn more, you can discover more insights about home preservation on SelectQuote.com.
Navigating Different Wall Surfaces with Confidence
Not all walls are created equal. What works for modern drywall might be a total disaster for the charming plaster of an older home. The secret is to match your hardware to your wall type.
Here’s a look at common scenarios and the perfect solutions:
- For Plaster Walls: Standard plastic anchors often struggle with brittle plaster. Instead, opt for self-drilling metal anchors. They cut cleanly through the tough plaster and lath without causing cracks, creating a secure hold where other methods fail.
- For Brick Walls: Exposed brick is beautiful but tricky. The key is to avoid drilling into the brick itself, which can cause it to crack. Try using brick clips—clever metal fasteners that clamp onto the mortar joints, giving you a sturdy hanging point without a single hole.
- For Drywall (Without a Stud): When you can't find a stud exactly where you need one, a high-quality wall anchor is your best friend. Forget the flimsy ones that come with new products and invest in a better option.
Think of your wall type as a unique personality. By understanding and respecting its needs, you set the stage for a lasting, harmonious relationship with your decor.
Choosing the Right Anchor for the Job
When a stud isn't available, anchors are essential for distributing the weight of your art across the drywall. They expand behind the wall, creating a solid grip that prevents the screw from pulling out.
Let's break down the most common types:
| Anchor Type | Best For | Holding Power | How It Works |
|---|---|---|---|
| Winged Plastic Anchors | Mid-weight items (5-25 lbs) | Good | The plastic "wings" split open behind the drywall to create a secure grip. A great all-around choice. |
| Self-Drilling Anchors | Heavier items (25-50 lbs) & plaster | Very Good | These have a sharp tip that drills its own hole, making installation fast. Metal versions are ideal for plaster. |
| Toggle Bolts | Very heavy items (50+ lbs) | Excellent | A metal bar on a spring-loaded wing folds to go through a hole, then opens flat against the back of the wall. |
By choosing the right anchor, you’re not just hanging a picture; you are making a thoughtful decision that protects your home. This approach empowers you to hang even your most substantial pieces with confidence, knowing they are safe and secure.
Mindful Placement for a Flawless Finish
You’ve picked out the perfect damage-free hangers and have your favorite art ready to go. Now for the fun part. This is where the real artistry begins—not just hanging a picture, but placing it with intention to create a space you love while keeping your walls pristine for years to come.
Thinking about placement ahead of time makes all the difference. It turns decorating from a chore into a thoughtful, creative process, ensuring your final display looks amazing and prevents those little scuffs and marks that can happen over time.
Your Secret Weapon Against Scuff Marks
Ever taken a picture down and found a faint, dark outline on the wall? Those annoying scuff marks happen when the frame vibrates and rubs against the paint. Thankfully, the solution is incredibly simple.
Practical Action Point: Use rubber bumpers. These small, self-adhesive polyurethane dots are a decorator’s secret weapon. Just stick one on each bottom corner of your frame to create a tiny, invisible gap. This little cushion does two brilliant things:
- It prevents scuffing by stopping the frame from making direct contact with the wall, which eliminates friction marks entirely.
- It allows for airflow, promoting circulation behind the art. This is crucial in humid areas to prevent moisture buildup that could damage both your wall and the artwork.
Did you know that over 55% of tenant disputes involve wall scuffs and nail holes from hanging pictures? A simple fix like rubber bumpers can prevent up to 95% of those friction marks.
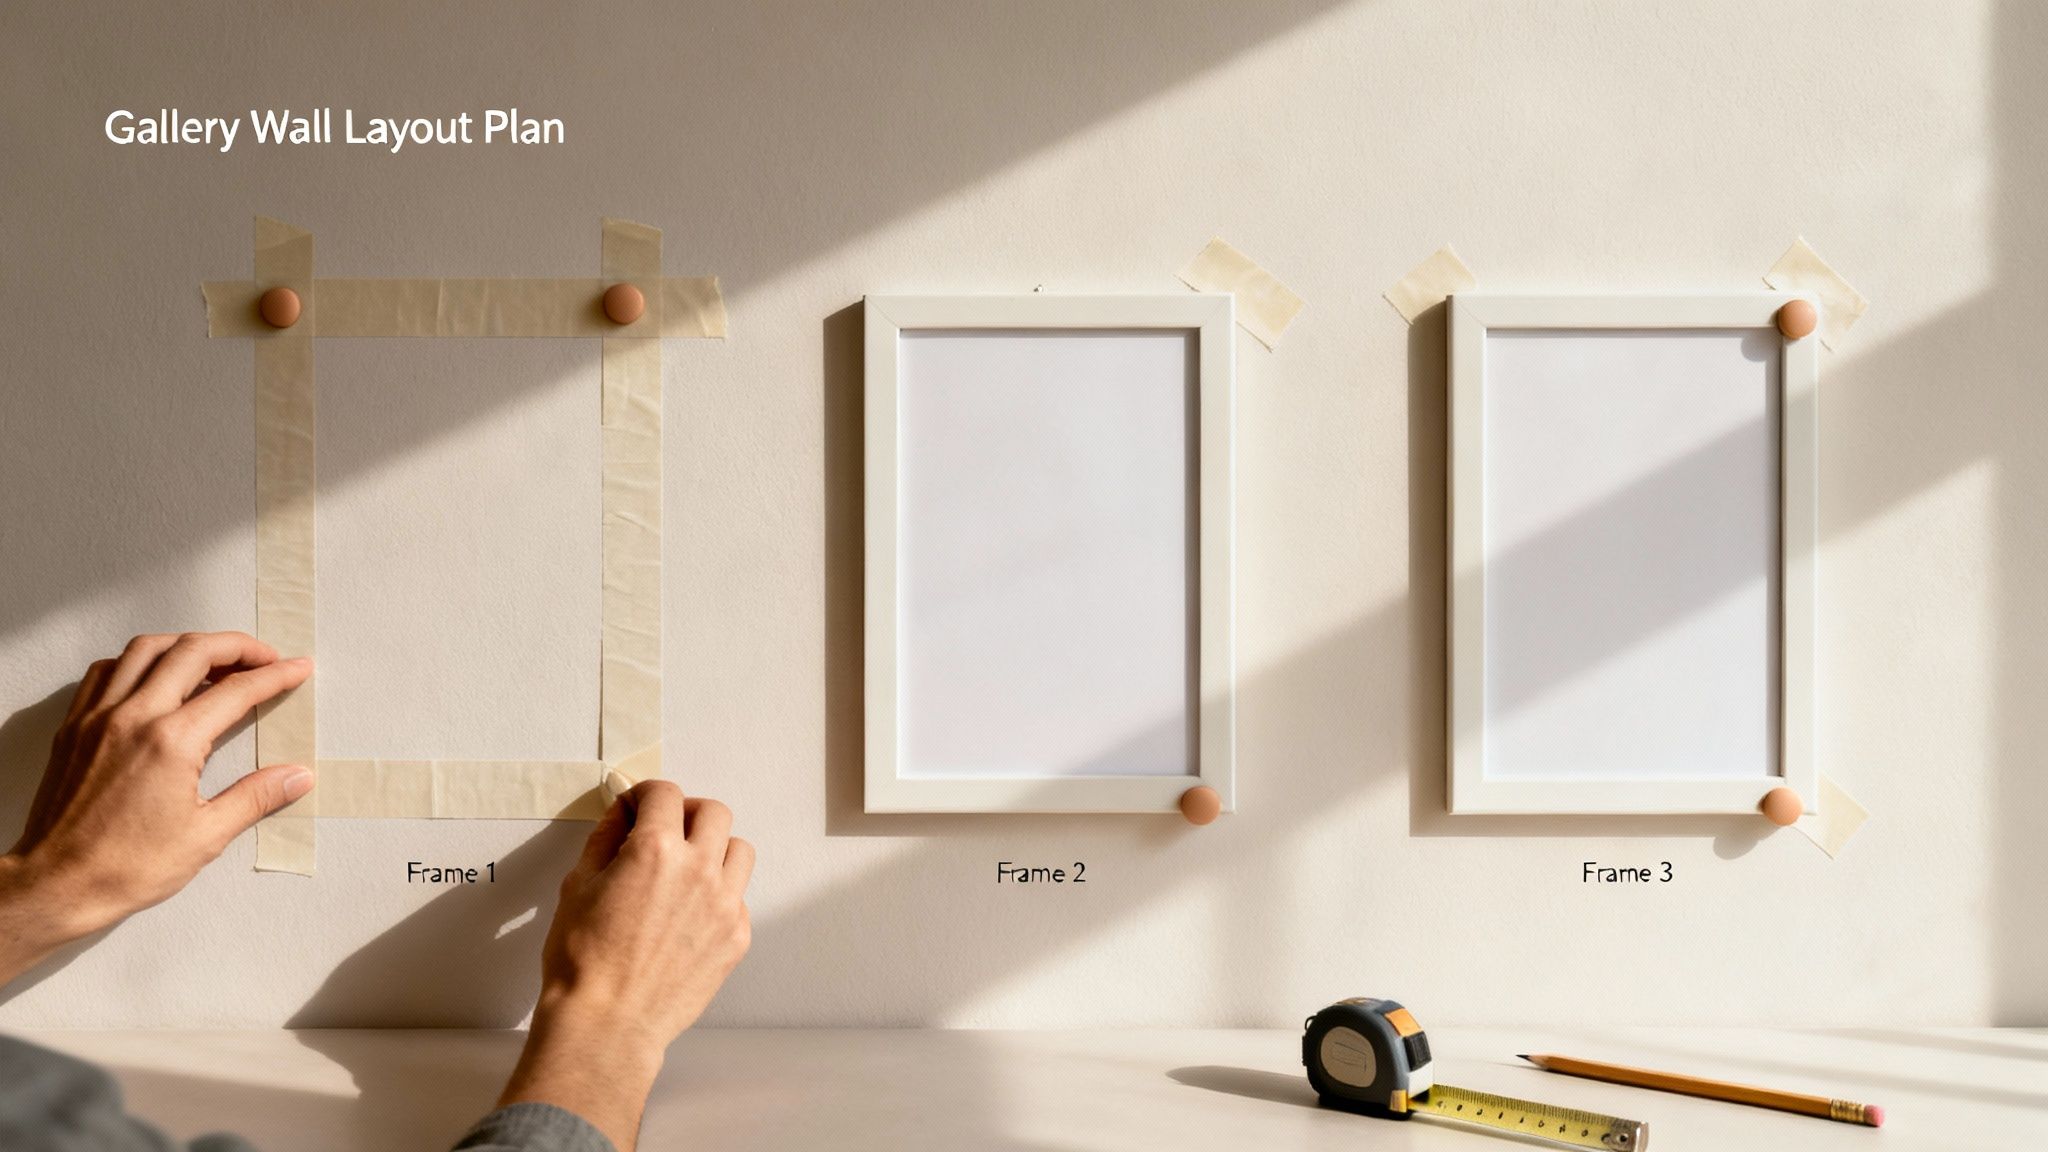
Planning Your Layout With Zero Commitment
The most intimidating part of a gallery wall is the commitment. What if you hang everything and the spacing is just… off? What if you could visualize the entire layout before making a single mark?
This is where painter's tape comes in. This low-tack tape is your ticket to a totally stress-free layout process.
Here’s a fantastic action plan to map everything out perfectly:
- Trace each of your frames onto craft paper or newspaper and cut them out.
- Use small pieces of painter’s tape to stick these paper templates on your wall.
- Now, you can live with it! Step back, move things around, and play with the arrangement until it feels just right.
This method gives you the freedom to design with total confidence, ensuring you’ll love the final result before you commit. For more layout inspiration, check out our guide on how to arrange photos on a wall.
"Planning your layout with painter's tape is like creating a dress rehearsal for your walls. It removes all the guesswork and gives you the confidence to execute your vision flawlessly."
Achieving Perfect Alignment and Leveling
Once your layout is locked in, the final details make all the difference. A perfectly level picture brings a sense of calm and order to a room, while a crooked one can make everything feel off-kilter.
A laser level is an amazing tool for gallery walls, projecting a crisp, straight line to guide your placement. But if you don't have one, no worries—a traditional bubble level and a pencil work just as well. Just be sure to mark your hanging points lightly so you can easily erase them later.
For a deeper dive into getting it just right, you might find a step-by-step guide to hanging your picture with precision helpful. These final touches are what elevate your display from simply hung to beautifully curated.
Taking Your Art Down Without a Trace
The best part about damage-free decorating isn't just the hanging—it's the freedom to change your mind. When you're ready to rearrange your gallery wall or it's time to move, the real test is getting everything down while leaving your walls looking untouched.
This is what turns decorating from a stressful commitment into a joyful, creative process. You can experiment with total confidence, knowing your walls will stay pristine. The process is surprisingly simple and proves you can refresh your space whenever inspiration strikes.
The Gentle Art of Adhesive Removal
When using adhesive strips, there's a specific technique that makes all the difference. The single most important rule is to resist the urge to just pull the strip straight off the wall. The magic is in a slow, deliberate stretch.
This works because of viscoelasticity—the scientific principle that allows the adhesive to elongate and lose its grip when stretched, releasing cleanly from the surface. It’s designed to let go without a fight, leaving your paint exactly where it belongs.
Here’s your action plan for a perfect removal every time:
- Support the Hook: Gently hold the plastic hook or the picture frame so it doesn't snap off the wall.
- Grip the Tab: Get a firm hold on the little removal tab at the bottom of the strip.
- Stretch Straight Down: Slowly pull the tab straight down, keeping it parallel to the wall. Never pull it out towards you. It’s amazing how far it can go—sometimes up to 15 inches before it finally lets go.
- Keep It Slow: A steady, unhurried pace is your best friend here. Just keep stretching until the strip comes off completely.
This patient stretch is the secret to a truly traceless removal. You're working with the adhesive’s design, not against it, which is how you ensure your paint stays put.
Making Minor Imperfections Vanish
If you went with low-impact hardware like tiny nails or special hangers, you might be left with a few pinholes. Good news: these are incredibly easy to fix. You can make them disappear in minutes, no DIY expertise required.
Practical Action Point: For a quick, invisible repair, all you need is a small tub of spackling paste.
Use your fingertip or a small putty knife to press a tiny dab of spackle right into the hole. Then, just scrape away any excess so the patch is perfectly flush with the wall.
Once it's dry—which usually takes less than an hour for small holes—you might not even need to paint. If you do, a light dab with a small craft brush and your leftover wall paint will make the spot vanish. In a pinch for a white wall? A tiny dot of white, non-gel toothpaste can work as a temporary fix!
This simple last step brings the whole process full circle. It empowers you to not only hang your art with confidence but also take it down with grace, leaving your space ready for its next beautiful chapter.
Your Damage-Free Hanging Questions Answered
Even with the best guide, a few questions always pop up once you get started. It’s completely normal! Think of this as our chance to chat about those lingering thoughts so you can move forward with total confidence.
Let's dive into some of the most common questions people have about hanging pictures without wrecking their walls. These answers should help you handle those tricky little situations that come up along the way.
Can I Reuse Adhesive Strips After Taking Them Down
That’s a great question, and the short answer is no—adhesive strips are strictly a one-time-use product. The magic that lets them come off cleanly is the fact that the adhesive stretches out, and once it does that, its bond is permanently broken. Trying to reuse a strip would be a recipe for disaster.
Action Point: If you’re looking for a truly reusable solution, a picture rail system is a fantastic investment. Once the rail is up near the ceiling, you can use adjustable wires and hooks to change your display whenever inspiration strikes, all without a single new hole.
What Is the Best Way to Hang Pictures on Textured Walls
Textured walls, like gorgeous old plaster or rustic brick, can definitely be a challenge for standard adhesives. They need a perfectly smooth surface to get a good grip. But don't worry, you've got options.
- For Plaster: Steer clear of standard plastic anchors; they can expand and cause cracks. Instead, look for hardened-steel picture hooks. They’re designed to be tapped gently into plaster, leaving a tiny, super-strong pinhole.
- For Exposed Brick: The secret here is to work with the wall, not fight it. Brick clips are clever little metal fasteners that clamp right onto the mortar joints, giving you a sturdy hanging point without any drilling at all.
- For Rough Surfaces: If you really want to use an adhesive, make sure you choose one specifically made for textured surfaces. The key is to test it somewhere hidden first and follow the manufacturer's weight limits to the letter.
How Do I Know How Much My Framed Art Weighs
This is so important! Guessing the weight of your artwork can lead to an overloaded hook and a broken frame. Thankfully, finding out the exact weight is incredibly simple.
Practical Action Point: Just use a regular bathroom scale. First, weigh yourself and jot down the number. Then, hop back on the scale while holding your framed picture. The difference between the two numbers is the weight of your art. For smaller, lighter items, a kitchen scale is perfect.
Always choose a hanging solution rated for slightly more than your item's actual weight. This simple step provides an extra margin of safety and gives you complete peace of mind.
Are There Eco-Friendly Options for Hanging Pictures
Absolutely! It feels so good to decorate in a way that’s kind to both you and the planet.
Picture rail systems are a wonderful long-term, eco-friendly choice because they eliminate the need for disposable adhesives. You can also find high-quality picture hooks and wires made from recycled metals. For more tips on putting up common wall decor without leaving a trace, you can find great advice on how to put a poster on a wall without damage.
Another creative idea is to think beyond the wall itself. Leaning larger frames on a mantle, bookshelf, or a chic decorative ladder avoids any wall contact. It not only prevents damage but adds a unique, layered look to your space that feels thoughtful and personal.
At Mesmos, we believe your home should be a sanctuary of peace and inspiration. Our thoughtfully designed decor pieces are created to bring a sense of calm and mindfulness to your everyday life. Explore our collection and find the perfect art to begin your damage-free decorating journey today. Discover meaningful decor at https://mesmos.co.
